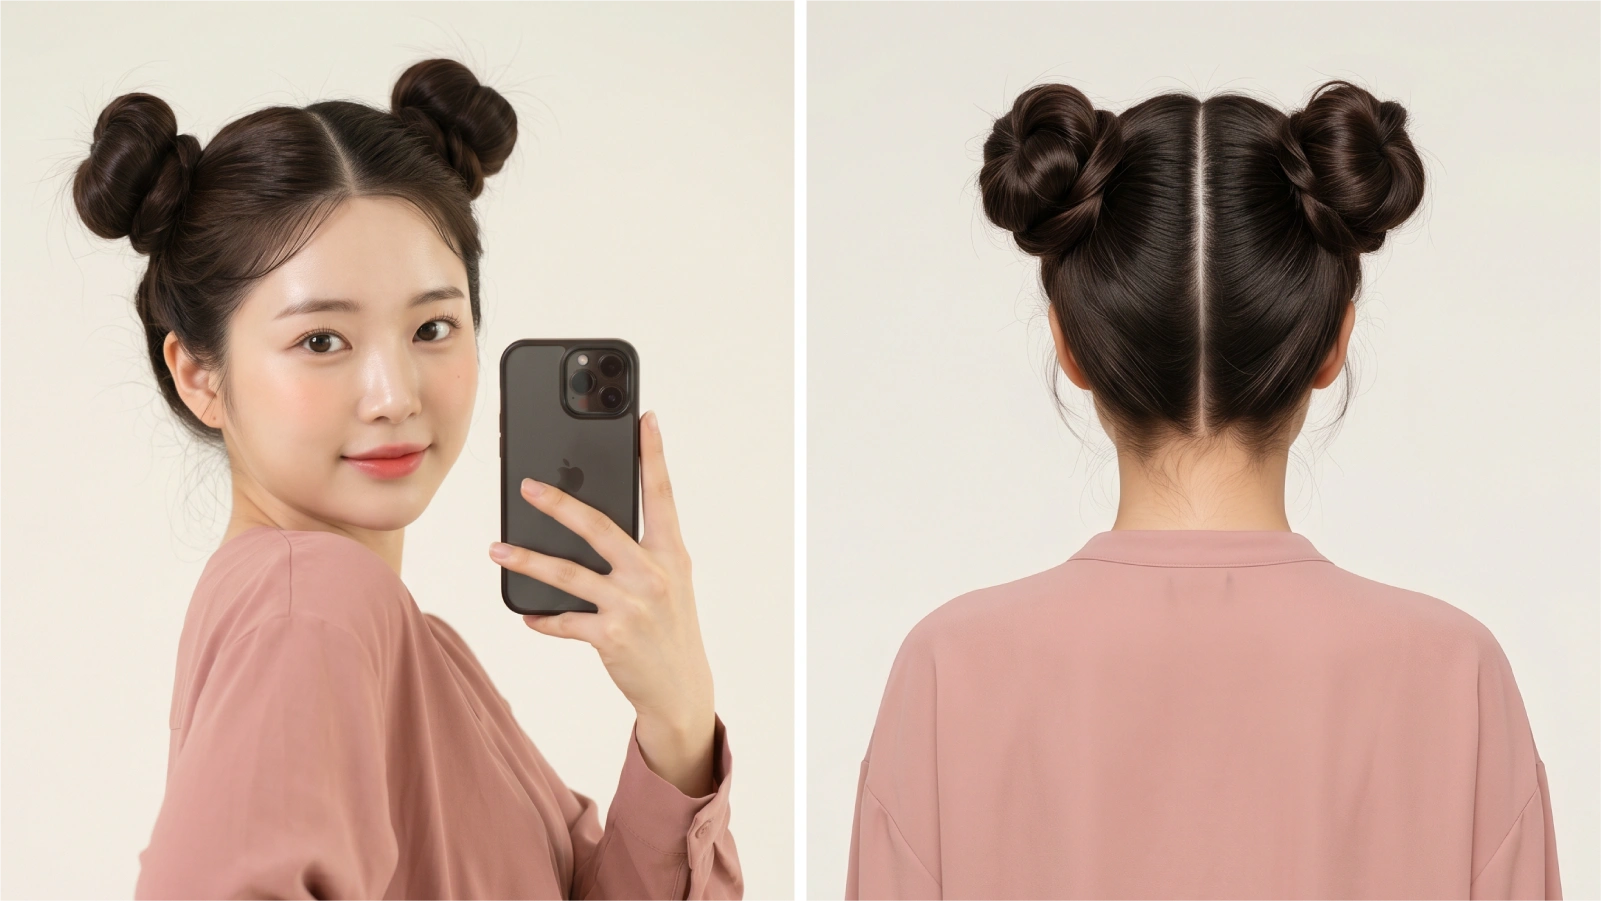
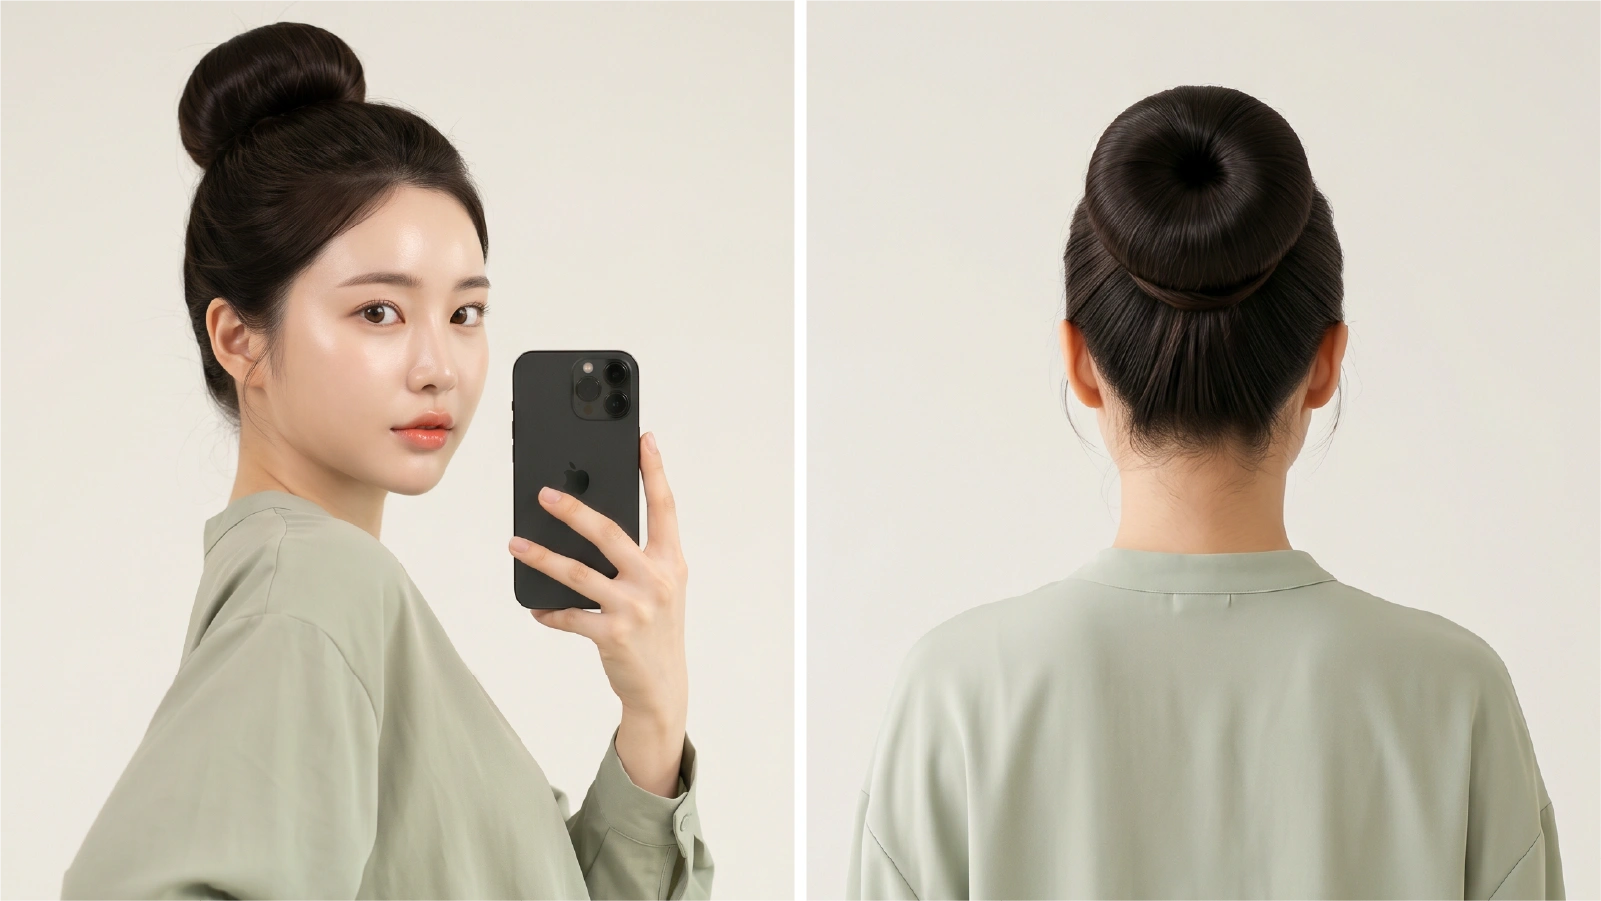
Space buns are a double-bun updo created by parting hair down the center, securing each section into a high ponytail, then coiling and pinning each ponytail into a bun on either side of the head. The style takes under 10 minutes, holds through full-day wear with the right products, and works across straight, wavy, curly, and natural hair textures, making it one of the most versatile quick hairstyles for women you can add to your rotation.
Originally popularized by Princess Leia in the 1977 Star Wars franchise—itself inspired by 19th-century Mexican revolutionary women and the Hopi tribe’s traditional “squash blossom” (pahko’ala) style—space buns have cycled back through ’90s pop culture, Y2K, and now a full 2020s revival. Nearly half a million posts are tagged #spacebuns on Instagram, proving this is no passing trend.
Style Snapshot
What Are the Different Types of Space Buns?
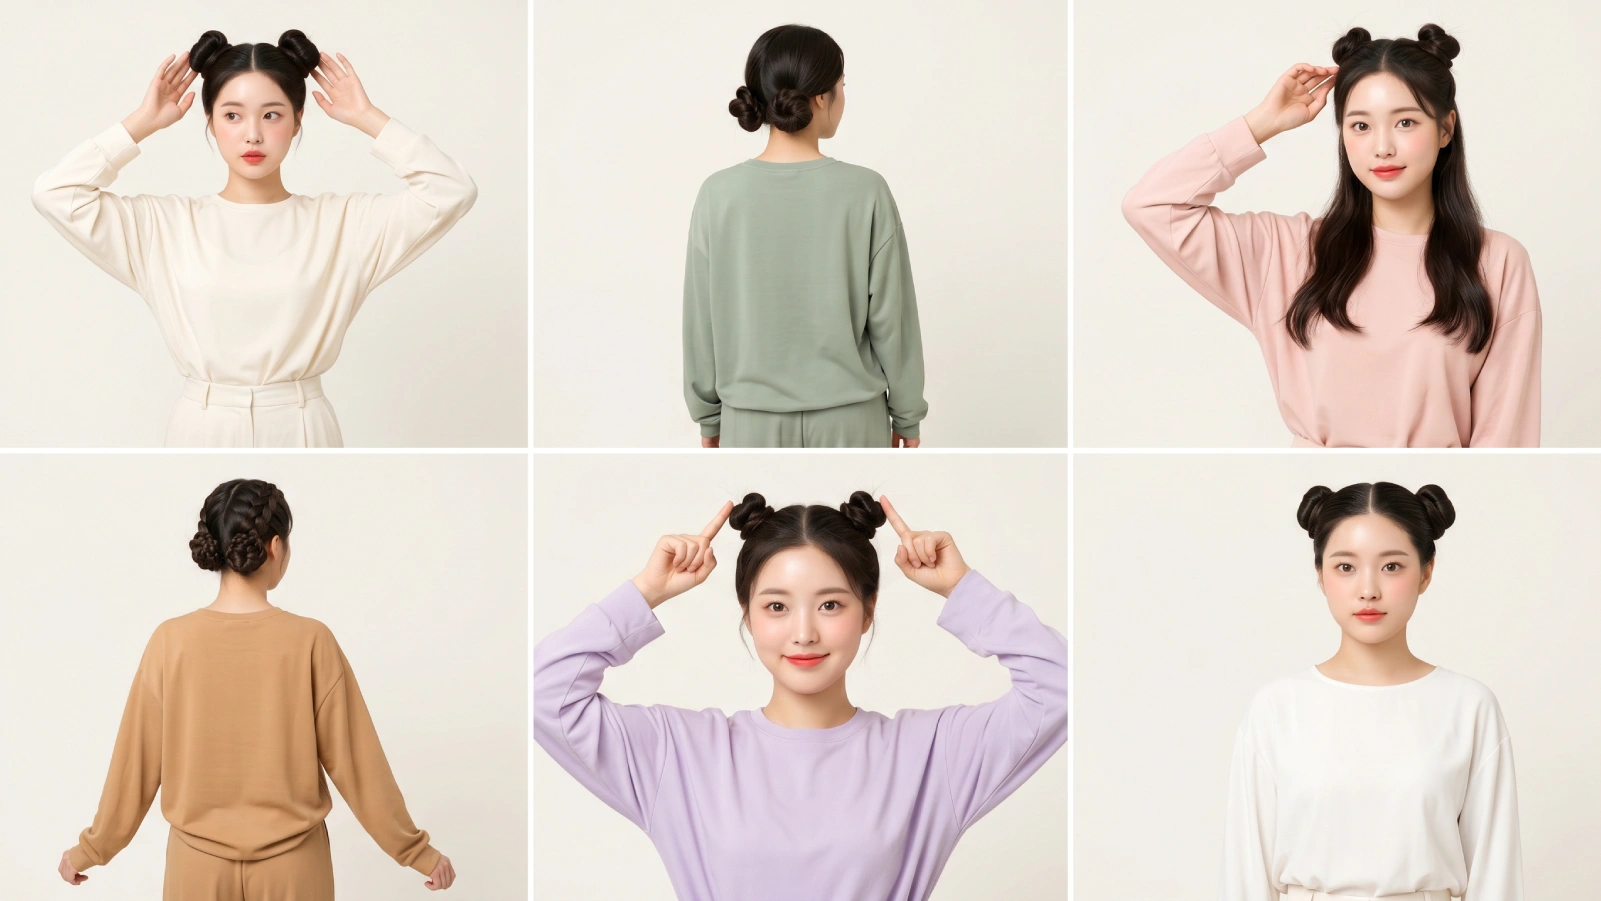
Not all space buns are the same look. The placement, texture, and technique you choose changes the vibe completely—from carefree festival to boardroom-adjacent. Here’s how the main variations compare:
Space buns positioned at the nape of the neck read as sophisticated enough for most workplaces, while high-crown placement skews playful and festival-ready.
For the classic high style, your go-to for a messy bun energy on both sides, loose twisting and deliberately imperfect coiling are what make the look feel intentional rather than rushed.
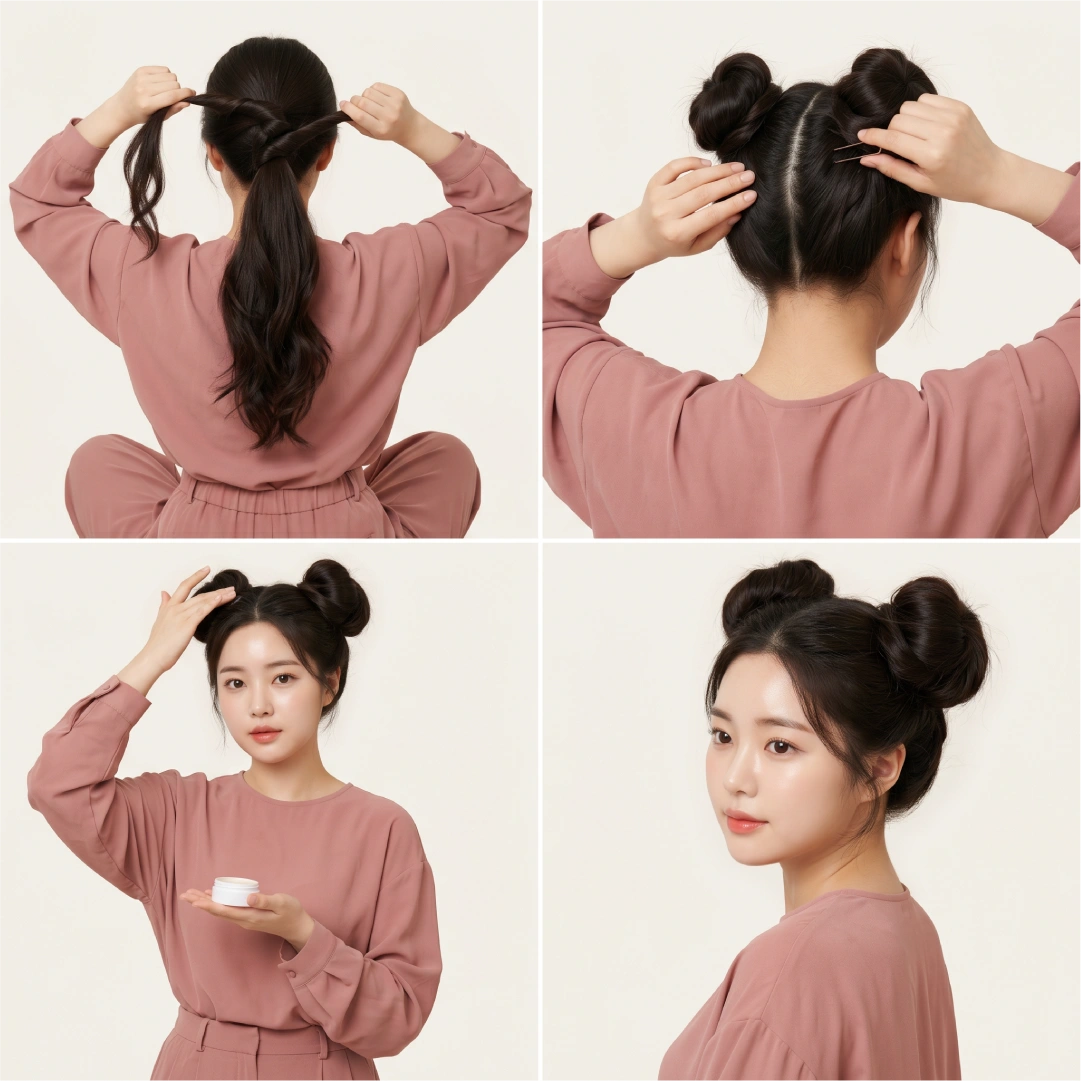
How Do You Do Space Buns Step by Step?
Here’s the honest breakdown—the steps most tutorials rush past are steps 2 and 4.
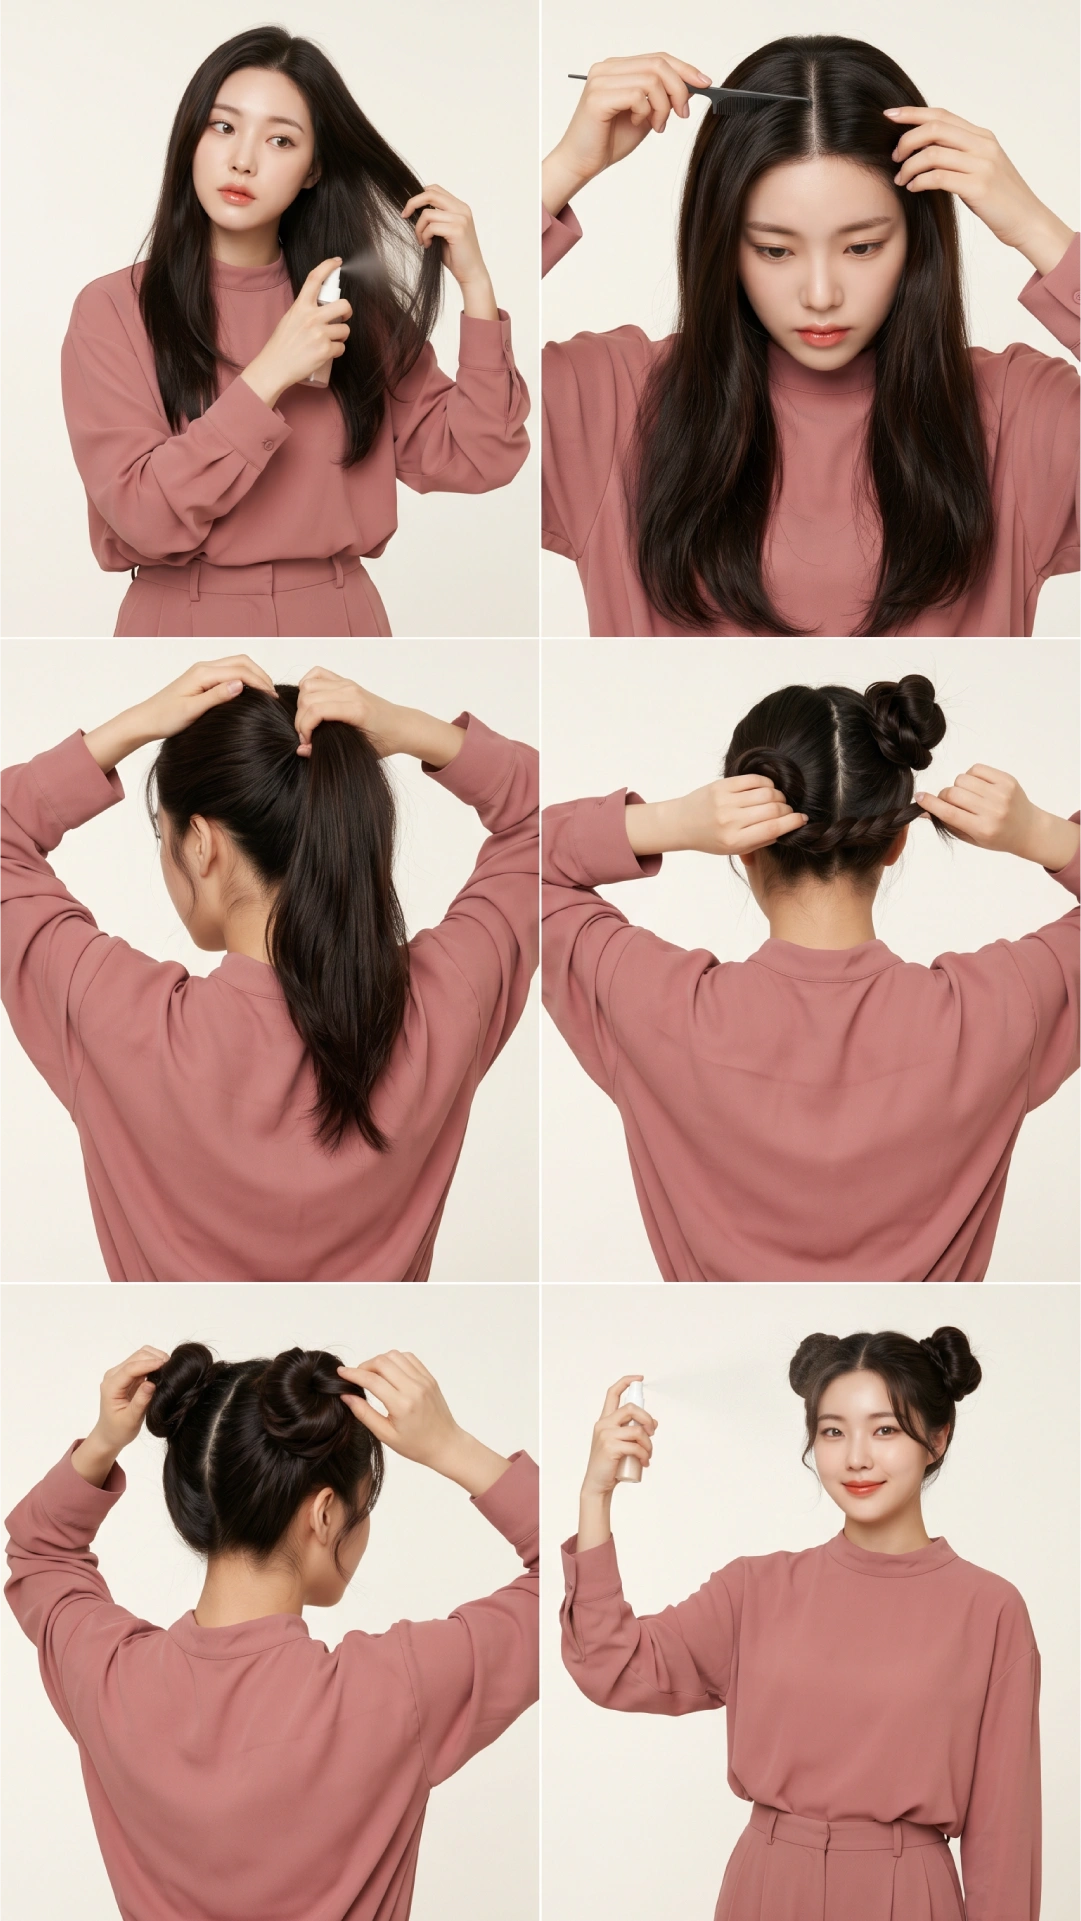
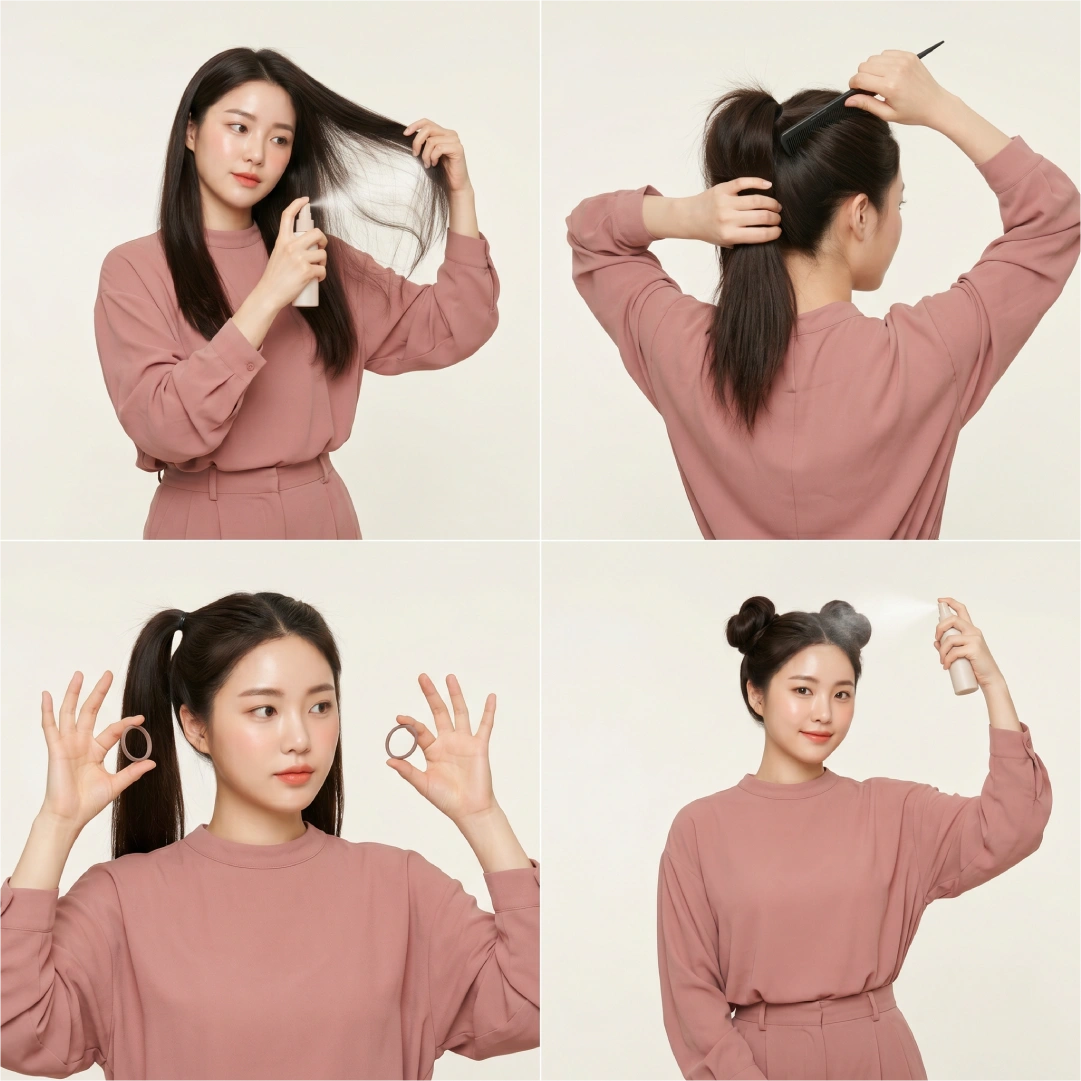
- Prep your hair. Day-old hair is ideal. Many stylists agree that day-old hair is the ideal canvas because natural oils provide grit and texture, helping the style hold better. If your hair is freshly washed, spray texturizing spray or dry shampoo from root to mid-shaft before starting.
- Create your part. Use a rat-tail comb for a clean center part. For a ’90s upgrade, go with a zigzag part. The part needs to be precise—lopsided parts lead to uneven buns.
- Clip one side away. Secure the half you’re not working on first. This prevents accidental tangling.
- Build each ponytail. Gather hair into a high ponytail and secure with an elastic. If you want volume, backcomb the ponytail base before coiling—this is the step that separates flat buns from full ones.
- Twist and coil. Twist the ponytail along its length, then wrap the twisted rope around the elastic base in a spiral. Secure with a second elastic and 2-4 bobby pins.
- Fan and pin. Gently pull the edges of each bun outward to create width, then pin any loose sections underneath.
- Set it. A medium-hold hairspray over both buns adds longevity. For an all-day event, a light-hold gel on the roots before step 3 gives extra anchor.
Common mistakes to fix immediately:
- Buns slipping by midday? You skipped texturizing spray, or your elastics are too silky. Switch to matte elastics.
- Flat, pancake buns? You didn’t backcomb before coiling—and you’re twisting too tightly. Loose twist = more volume.
- Lopsided buns? Your ponytails aren’t the same height. Use a mirror to check symmetry before coiling.
Which Space Bun Style Works for Your Face Shape?
This is the section every competitor skips. Face shape determines whether your space buns frame you or fight you.
- Oval face: Any placement works. Classic high buns are ideal—this is the most flexible face shape for the style.
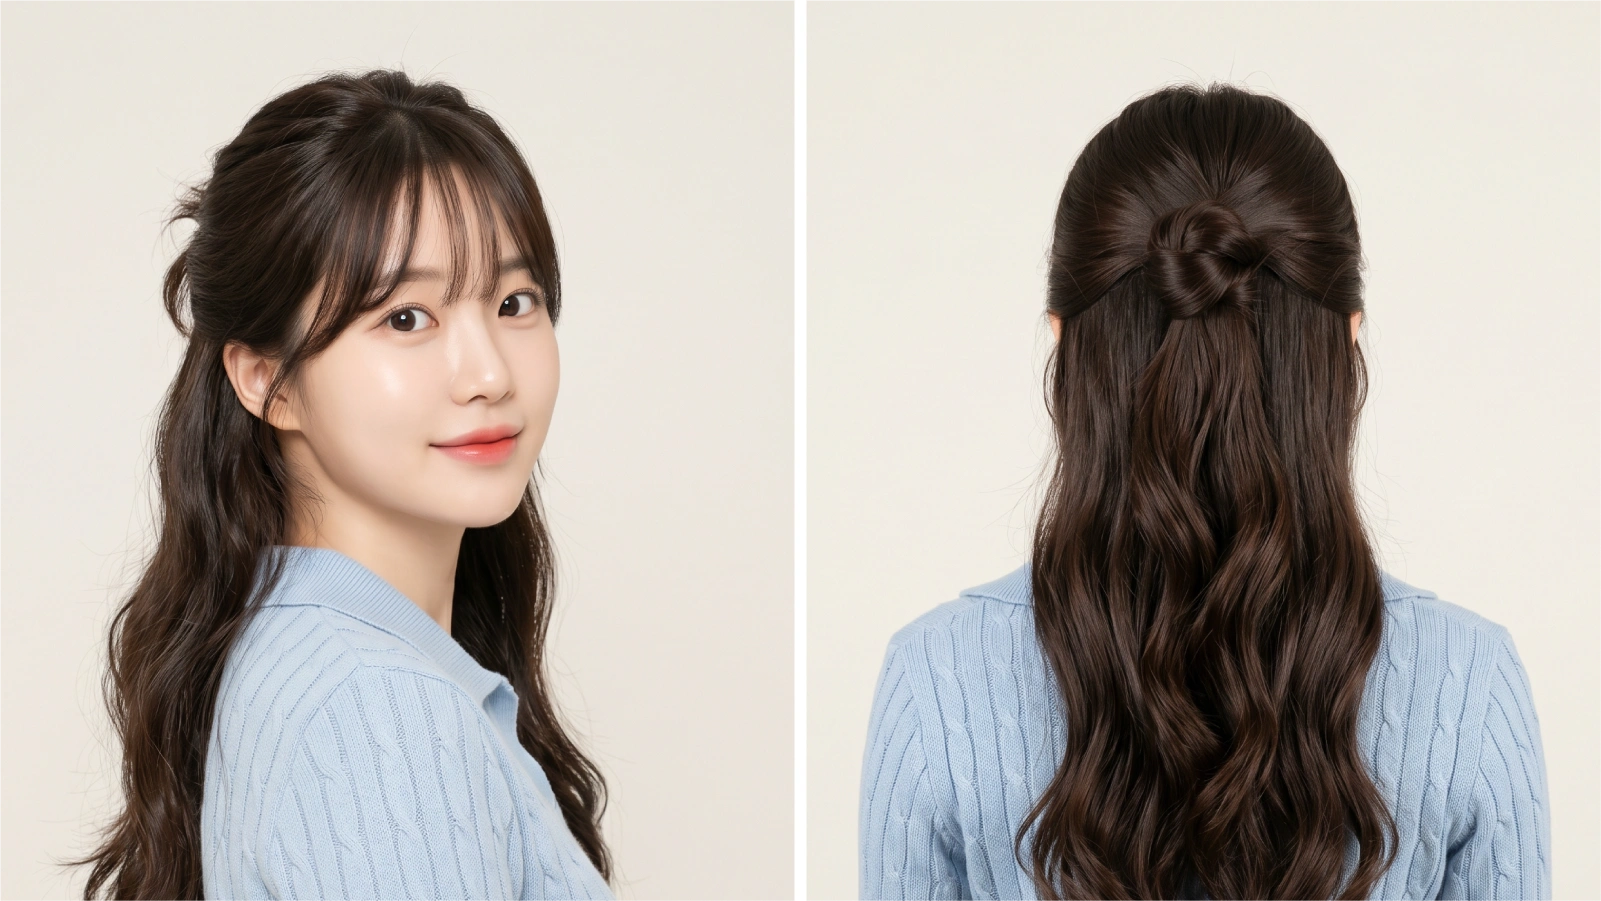
- Round face: Loose front pieces that frame your face help make the hairstyle more flattering for round and square face shapes. Place buns slightly higher on the crown (not centered) to add vertical lift. Leave two tendrils down at the temples.
- Square face: Soften jaw angles with a half up half down style—top buns with loose waves below break up strong jawlines beautifully.
- Heart face: Low space buns at the nape of the neck balance a wider forehead. Avoid very high placements that add top-heavy width.
- Long/oblong face: Wide, voluminous high buns add horizontal width and shorten the appearance of length. Fan buns outward more aggressively.
For round faces, high-crown placement with face-framing tendrils adds the vertical lift that makes space buns genuinely flattering rather than width-adding.
How Do You Make Space Buns Last All Day?
Longevity is the question Reddit gets right and tutorials get wrong. The hold strategy changes based on hair texture.
For fine or straight hair:
- Apply texturizing spray before parting—this is non-negotiable
- Backcomb ponytail bases before coiling
- Use matte, no-slip elastics (not satin-covered ones)
- Finish with a strong-hold hairspray, not flexible hold
For thick or coarse hair:
- Split each ponytail into two sub-sections, twist each separately, then wrap them around each other before coiling—this distributes weight and prevents drooping
- Use U-shaped pins rather than standard bobby pins for stronger anchor points
- A light pomade on the outside of each finished bun tames surface frizz
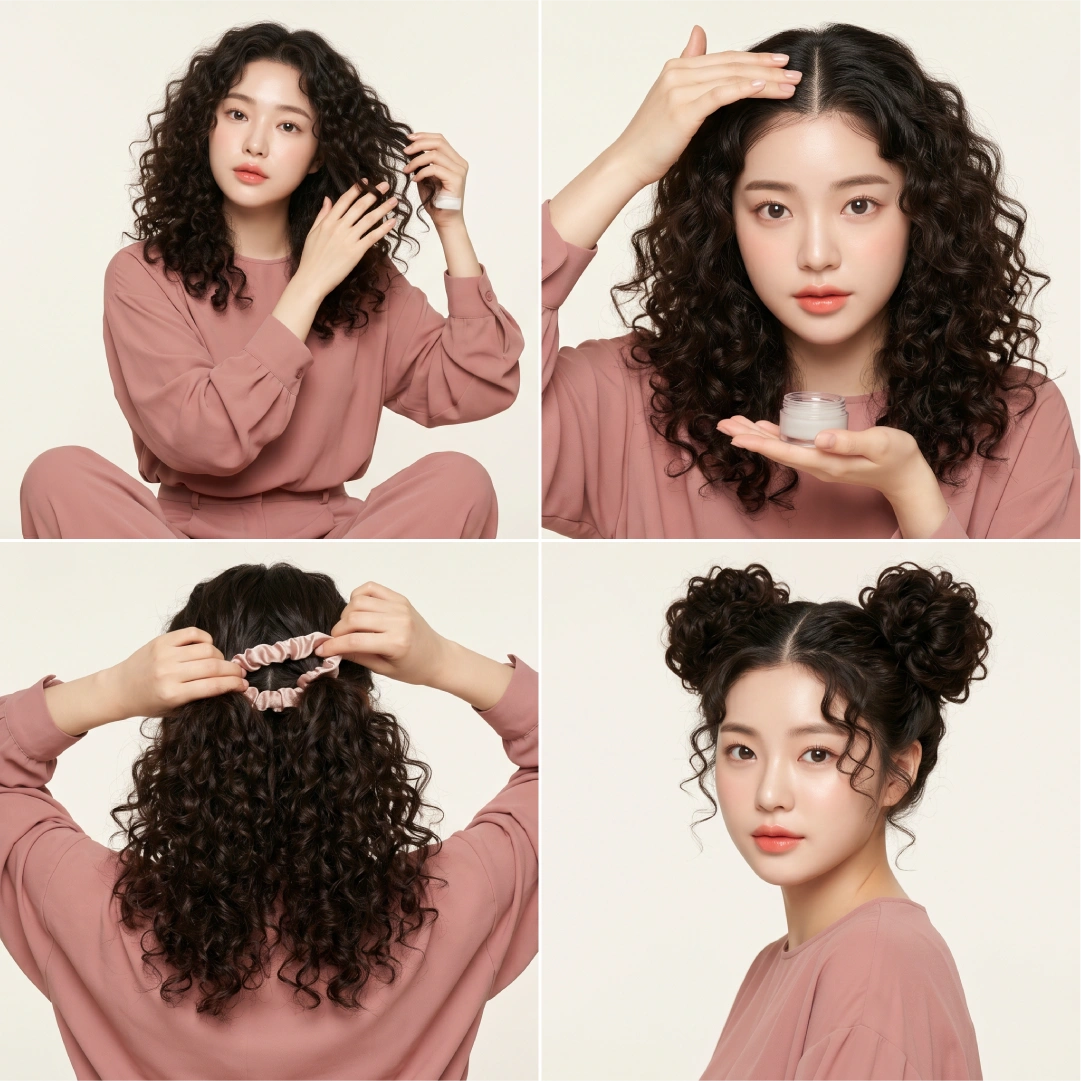
For curly or natural hair:
- Apply a leave-in conditioner before parting to keep curls pliable
- Use a gel on the edges for a clean part
- Secure with satin-lined elastics to minimize breakage at the low bun base or ponytail anchor point
Spritzing a texturizing spray or dry shampoo throughout your hair, focusing on the roots and mid-lengths, absorbs excess oil and adds the necessary volume and grip to make buns look fuller and last longer.
Frequently Asked Questions
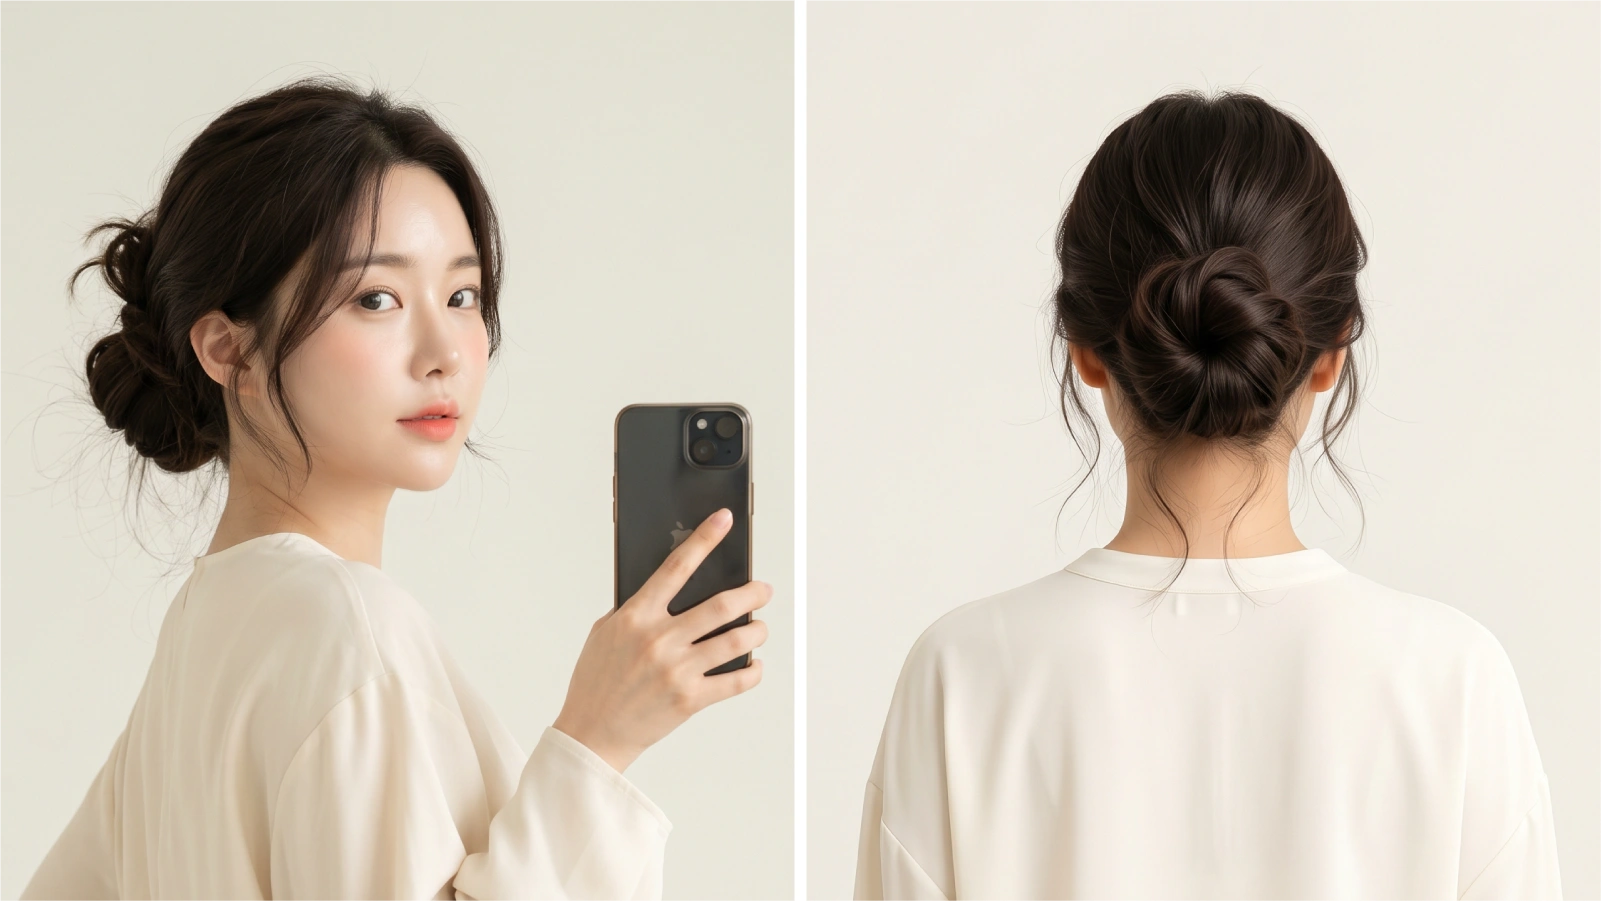
Yes—with the right variation. Low space buns positioned at the nape of the neck, styled sleek rather than messy, read as a polished updo rather than a festival style. Pairing them with a tailored blazer and minimal accessories shifts the aesthetic entirely.
Yes. Mini space buns are ideal for fine hair and don’t require any texturizing products, heat styling, or extensions—they have a cool ’90s vibe and can be styled in seconds. For a bob, work with what reaches: small buns at the crown with tendrils framing the face work on hair as short as 3 inches.
They’re the same hairstyle with different names. “Space buns” became the dominant term due to the Star Wars/Princess Leia association. “Double buns” is used interchangeably, though some stylists use “double buns” to describe any two-bun placement including low or side variations.
Three moves: choose a sleek finish over messy, position buns low rather than high, and skip the butterfly clips in favor of minimal or no accessories. A slicked-back base with a center part reads sophisticated at any age.
Not inherently—but tight elastics placed at the same point daily cause breakage over time. Rotate your ponytail height slightly each time, use seamless or satin elastics, and avoid securing buns so tightly the roots feel tension when you move your head.
Key Takeaways
Space buns are one of the few hairstyles that genuinely work across hair types, lengths, ages, and occasions—if you match the variation to your face shape and context:
- High + messy = festivals, casual weekends, concert nights
- Low + sleek = office, weddings, date nights
- Half-up = everyday wear, wavy and curly hair types
- Braided = maximum impact, creative occasions
- Mini = fine hair, short hair, five-minute mornings
The one universal rule: prep matters more than technique. Texturizing spray before you part, backcombing before you coil, and matte elastics over silky ones solve 90% of all space bun problems before they start. From there, it’s just practice.