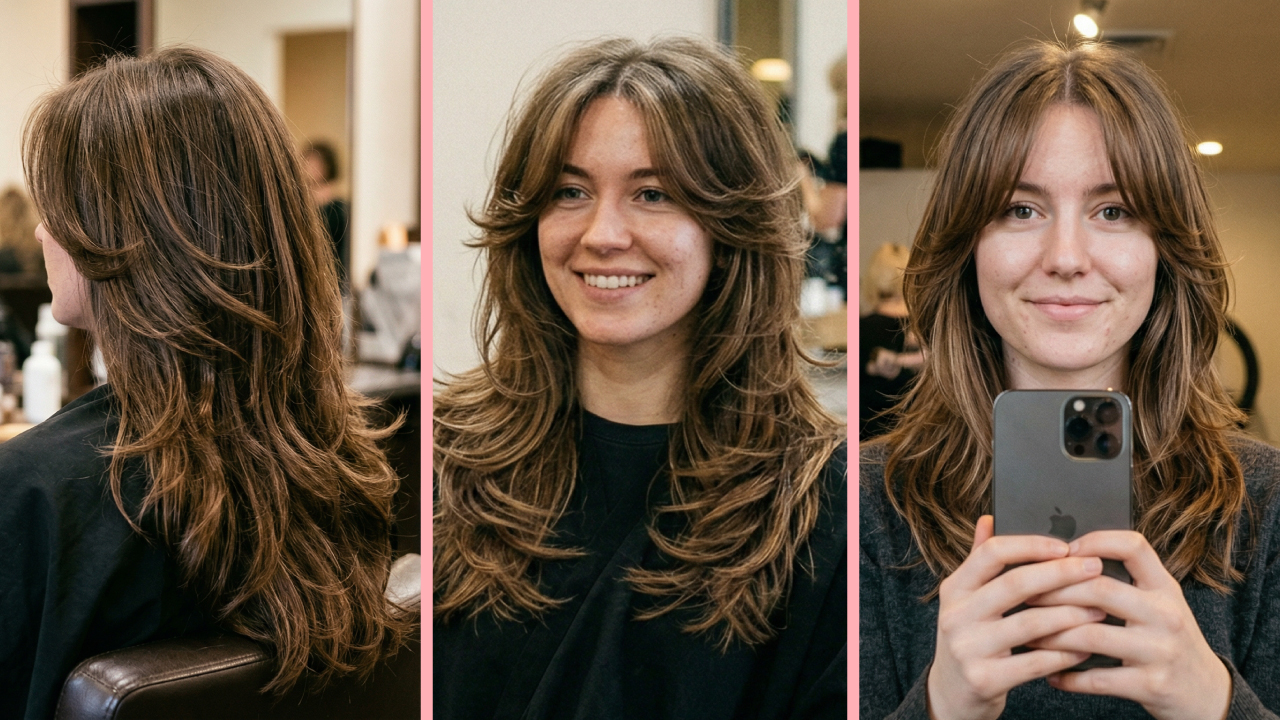
The butterfly haircut is a layered hairstyle that combines short face-framing pieces (typically cheekbone to jaw length) with longer layers at the back, creating a silhouette that resembles butterfly wings in motion. It adds serious volume, softens facial features, and—unlike most trending cuts—grows out gracefully instead of awkwardly. Whether you’re on the fence or already booked at the salon, this guide covers everything competitors skip: realistic costs, honest fail factors, air-dry results, and a three-way comparison against the wolf cut and hush cut so you can walk in knowing exactly what to ask for.
What Exactly Is a Butterfly Haircut?
Here’s the simplest way to think about it: the butterfly cut gives you two haircuts in one. The shorter layers, starting around cheekbone or chin height, act as a built-in curtain fringe that frames your face. The longer layers below preserve your overall length and create cascading movement through the back. When styled with a blow dryer and round brush—or even just tousled with your fingers—those layers fan outward like wings.
The cut draws from two distinct eras. Its face-framing volume is rooted in the Farrah Fawcett feathered look of the late 1970s, while the layered, bouncy structure echoes the “Rachel” haircut popularized by Jennifer Aniston on Friends in the 1990s. TikTok and Instagram revived it in 2022–2023, with creator Brad Mondo (known for his hair transformation tutorials) playing a major role in turning it into a DIY-friendly viral trend.
The butterfly haircut is the rare style that looks intentional at every stage of its grow-out—a quality almost no other layered cut can claim.
Key characteristics at a glance:
- Two distinct layer zones: Short face-framers (cheekbone–jaw) + long back layers (shoulder and below)
- Named style inspiration: Butterfly wings — layers fan outward from the center part
- Texture result: Soft, polished, voluminous — not choppy or shaggy
- Common alternative names: Butterfly layers, butterfly cut, sometimes confused with the octopus cut (which has more extreme length contrast)
- Closest relatives: Wolf cut (edgier, choppier), shag haircut (heavier layers throughout), hush cut (softer Korean-inspired version)
Butterfly Cut vs. Wolf Cut vs. Hush Cut: Which One Is Actually Right for You?
This comparison is the one almost every competitor skips. You’ll see the butterfly vs. wolf cut discussed endlessly online, but the hush cut—a softer, Korean-inspired layered style popular in 2025–2026—is a direct stylistic rival that deserves equal attention.
If you want to look styled without spending 20 minutes on it every morning, the butterfly cut is more demanding than its reputation suggests — but the hush cut might be your sweet spot.
How Much Does a Butterfly Haircut Cost?
This is the question nobody answers — so let’s fix that. Salon pricing varies widely based on location, stylist experience, and whether the cut includes a blowout.
A few cost notes worth knowing:
- Thick hair often costs more — it takes longer to layer and debulk properly
- Add-ons like curtain bangs, thinning, or a color treatment will add $30–$100+
- In major metros (New York, Los Angeles, London), expect prices to run 30–50% higher than these ranges
- Trims every 6–8 weeks to maintain the shape add up — budget roughly $30–$70 per maintenance visit
The butterfly cut’s real cost isn’t the initial appointment — it’s the 6–8 week maintenance cadence most stylists recommend to keep the layers from losing their shape.
Which Face Shapes and Hair Types Does the Butterfly Cut Actually Suit?
Let’s be honest: nearly every competitor says “it suits everyone,” which is technically true but useless. Here’s the nuanced version.
By face shape:
- Round face: Ask your stylist to start the shortest layers at or above the cheekbones. This draws the eye upward and creates the illusion of length. Avoid layers that hit at the widest part of your face.
- Long/oblong face: Pair the butterfly layers with curtain bangs — this adds horizontal visual weight across the forehead and balances a longer silhouette.
- Heart-shaped face: Start layers at chin length or longer. Shorter face-framers can make a narrow chin look even more pointed.
- Square/angular face: Soft, wispy layers starting at jaw length gently round out sharp angles. Avoid very blunt face-framers.
- Oval face: Congratulations — you can request almost any variation. This is the most flexible face shape for butterfly layers.
By hair type:
- Fine/thin hair: The cut needs special handling here. Rather than all-over layering (which can make fine hair look stringy), ask for face-framing layers only, paired with a blunt baseline. This fakes thickness while giving you the butterfly framing effect.
- Thick/coarse hair: This is where butterfly layers shine. The layering removes bulk without sacrificing length. Your stylist may also use point cutting or internal texturizing to reduce density further.
- Wavy hair: The butterfly cut was practically made for wavy textures. Natural wave enhances the “fluttering” effect between the two layer zones without requiring extra heat styling.
- Curly hair: Possible, but requires a curl-specialized stylist. The key is cutting on dry hair so the stylist can see where the curl naturally sits — wet cuts on curly hair often result in layers that are far shorter than intended.
- Chemically straightened or relaxed hair: Works well. The layers behave predictably and hold their shape longer between trims.
Fine hair and the butterfly cut can work beautifully together — but only if your stylist resists the urge to layer everywhere, which is the single most common reason fine-haired clients regret the cut.
How to Style a Butterfly Haircut at Home (Without a Blowout Bar Budget)
Styling this cut well doesn’t require a professional setup — but it does require the right tools and a bit of technique. Here’s what actually works, broken down by effort level.
Tools you’ll want:
- Large round brush (2–2.5 inch barrel) — essential for lifting roots and curving layers outward
- Blow dryer with a concentrator nozzle — directs airflow precisely along each layer
- Velcro rollers (optional but excellent) — set the top layers for added lift without heat
- Curling wand or tong (1.5–2 inch barrel) — for touch-up waves on the longer back layers
The 3-level styling approach:
- Full blowout (20–30 min): Apply volumizing mousse to damp hair. Rough-dry to 80% with hands. Then, section by section, use the round brush to roll layers away from the face while directing heat down the hair shaft. Finish with Velcro rollers on top layers for 10 minutes, then cool completely before releasing.
- Quick refresh (10 min): Flip hair upside down, spritz a volumizing or texturizing spray at the roots, blow-dry briefly while scrunching upward. Flip back. Use a large-barrel tong to curl any face-framing pieces away from the face. Done.
- Air-dry (0 effort, honest results): Here’s what competitors won’t tell you — the butterfly cut air-dries unevenly for most people. Straight and wavy hair tends to look disconnected and flat at the roots. If you’re regularly skipping heat, consider whether the hush cut or a basic long-layered cut might suit your lifestyle better. Exception: naturally wavy and curly hair types often get excellent air-dry results because the texture fills in the volume gap.
Product pairings by hair type:
The butterfly cut rewards a round brush and five extra minutes of effort more than almost any other popular layered style — skip the blowout and it can look surprisingly flat.
What Are the Risks? (Honest Butterfly Cut Fail Factors)
Most guides skip this entirely. You deserve the full picture before committing.
Common reasons butterfly cuts go wrong — and how to avoid them:
- Layers cut above the cheekbone: This is the most common technical mistake. Short layers that sit above the cheekbone create an unintentional mullet-like separation rather than the butterfly wing effect. Always confirm your stylist is starting the face-framers at the cheekbone, not above it.
- Fine hair over-layered: If your stylist layers every section aggressively on thin hair, you’ll end up with wispy, stringy ends — the opposite of the voluminous look you’re after. Specifically request restrained layering with a blunt baseline.
- Cut on the wrong length: Shoulder length is really the minimum viable starting point. If your hair is chin-length or shorter, the two layer zones can’t exist properly — you’ll just end up with a lot of choppy layers and no “wing” shape.
- Wrong texture for air-drying: If you’re a genuine air-dry person and your hair is fine and straight, the butterfly cut will regularly disappoint you. Consider the hush cut instead.
- Skipping the grow-out conversation: Ask your stylist exactly what the cut looks like at the 3-month and 6-month mark. A good stylist walks you through the grow-out timeline before picking up the scissors.
The most avoidable butterfly cut mistake is letting a stylist start your face-framing layers above the cheekbone — that single error is the difference between butterfly wings and an accidental mullet.
How Does a Butterfly Haircut Grow Out?
The grow-out behavior is one of the strongest arguments for this cut — and competitors only partially cover it.
Month-by-month breakdown:
- Months 0–3: Full butterfly effect. Layers are distinct, volume is maximum, face-framers flutter perfectly with styling.
- Months 3–6: Face-framing pieces soften and lengthen into something resembling curtain bangs or cheek-length layers. The “wing” shape begins to relax. Still looks intentional and attractive — just softer.
- Months 6–9: The distinct two-layer zones begin blending into a standard long-layered cut. The crow volume decreases slightly. Most people at this stage choose between a trim to restore the butterfly structure or leaning into the grown-out layered look.
- Months 9–12: Layers are fully blended. You’re essentially back to a long layered cut. The only potentially awkward phase is when the shortest face-framers hit chin length — they may not tuck behind the ear cleanly for a few weeks.
The key takeaway:
Celebrity hairstylist Chris Long has noted that the butterfly cut “continues to deliver even when it grows out” — and that’s accurate. The grow-out is forgiving in a way that blunt bobs or choppy mullets simply aren’t.
Frequently Asked Questions About the Butterfly Haircut
A butterfly haircut is a layered style featuring short face-framing pieces (typically cheekbone to jaw length) and longer layers at the back. The contrast between the two lengths creates a “winged” silhouette when styled, hence the name.
The butterfly cut is soft, polished, and face-framing, with a refined feminine aesthetic. The wolf cut is choppier, edgier, and deliberately tousled. If the butterfly cut looks like refined volume, the wolf cut looks like intentional bedhead.
The hush cut, a Korean-inspired trend, uses much softer, more blended layering with less dramatic length contrast. It’s subtler and lower-maintenance than the butterfly cut and works especially well for people who don’t want obvious layering.
Yes, but with modifications. A skilled stylist will keep layers restrained and focus face-framing pieces around the cheekbone-to-jaw zone only, pairing them with a blunter baseline. Aggressive all-over layering on fine hair creates a stringy, thin result.
It can, but it must be done by a curl-specialist stylist on dry hair so the natural curl pattern is visible. Cutting curly hair wet causes layers to spring up far shorter than intended.
Shoulder length is the realistic minimum. The two distinct layer zones that define the butterfly cut need enough length below the shoulders to exist. Starting with chin-length hair usually results in a heavily-layered look without the true butterfly structure.
Roughly $25–$45 at chain salons, $55–$95 at mid-range independent salons, and $100–$180+ at upscale or specialist stylists. Prices vary by location, stylist experience, and whether a blowout is included.
Every 6–8 weeks to keep the layers defined and the face-framing pieces at the right length. If you’re growing it out, you can stretch to 10–12 weeks between trims.
Honestly, less impressive than heat-styled. Straight and fine hair types tend to look flat at the roots and disconnected through the layers when air-dried. Wavy and curly textures are the exception — natural texture fills in the volume and the cut looks intentional even without heat.
Brad Mondo’s tutorial popularized the DIY version, which uses a high ponytail sectioning method. It’s doable, but carries real risk — especially getting the face-framing layer length wrong. If you’re attempting it, start with less length cut than you think you need. You can always take more off; you can’t put it back.
Kaia Gerber, Sabrina Carpenter, and Matilda Djerf (Swedish influencer and style creator) have all been associated with the butterfly layers aesthetic. The look echoes Jennifer Aniston’s iconic 1990s “Rachel” cut from Friends, which remains the cultural blueprint for face-framing layered volume.
It depends on your hair type. If you have natural wave or texture, it can work with minimal effort. For straight, fine hair, the cut rewards daily styling. If you’re genuinely low-maintenance, the hush cut or a simple long layered cut will suit your lifestyle better.
Key Takeaways
- The butterfly haircut combines short face-framing layers (cheekbone–jaw) with longer back layers to create a voluminous, wing-shaped silhouette
- It works across most face shapes and hair types — with specific modifications for fine/thin hair and curly textures
- Salon cost ranges from ~$25 at chain salons to $180+ at specialist stylists; budget for 6–8 week maintenance trims
- The biggest fail factors: layers cut too high (above the cheekbone), over-layering fine hair, and attempting the cut on hair shorter than shoulder length
- Air-dry results vary significantly by hair type — straight and fine textures need heat styling to look their best
- The butterfly cut grows out gracefully over 9–12 months, transitioning into a soft long-layered look without an obvious awkward phase
- If the butterfly cut feels too high-maintenance, the hush cut offers a similar layered aesthetic with less styling commitment
For more on related layered styles, explore our guides on the wolf cut, the hush cut, and curtain bangs styling.